 One of the first hurdles in learning off-camera flash photography in the manual mode is knowing where to set your flash for that first test exposure. For beginners, it can almost seem arbitrary or random. More experienced photographers, on the other hand, always seem to get it pretty close on the first try.
Raising your first test shot "batting average" is as easy as 1,2,3. Hit the jump for a tip that's so easy, you'll probably wonder why you weren't already using it.
________
Today we are gonna make a cheat sheet for your flash in three simple steps. Think of it as an mental reference point, to quickly get you in the ballpark for your most common shooting setups.
The only things you'll need are a small piece of light colored tape (I used electrical tape in white) a Sharpie (or similar, fine-point permanent marker) and a few minutes.
Here's the process:
Choose a Typical Working Distance and Modifier
Let's say, for instance, that you normally shoot people, at a lighting distance of about 6 feet, with a shoot-through umbrella.
Set up your flash and umbrella in your living room and point it at something of reasonably normal tonal levels about six feet away.
Choose a good working aperture for your portraits -- say f/8, for instance. Set your camera to a standard ISO -- say, ISO 400. And be sure to do this indoors at your max sync speed (usually 1/250) to knock out the ambient light portion of the exposure.
Zero In a Power Setting
Now, fire some test frames, adjusting the flash's power output until your exposure looks good. You'll end up with a power setting in the manual mode. Say, for instance, that this setting ends up to be 1/4 power.
Write it Down
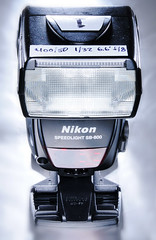
As shown in the photo above, write the settings down on a piece of tape and attach it to your flash. In your case, you might down:
STU-ISO400-6ft-f/8-1/4
This will tell you that, through your shoot-thru umbrella, you can expect f/8 from 6 feet away at 1/4 power at 400 ISO.
Are you always gonna shoot with those parameters? No, of course not. But it is a good starting point for choosing your flash's power level. And if something changes, you'll quickly be able to interpolate a new starting point.
For instance, say you wanted to shoot at f/4 instead of f/8. You'd just drop the power two stops (to 1/16th power) before firing your first test.
If you wanted to move the umbrella in closer - say to about four feet, you'd know to either close down a stop to f/11 or drop the power from 1/4 to 1/8. In the example above, my Nikon SB-800 has a reminder to me that in a direct mode (at ISO 400, 50mm zoom) I can expect f/8 from 1/32 power at about 6 1/2 feet.
(FWIW, I am constantly surprised at how powerful these little flashes are in direct mode.)
The point is to have a normal rational starting point from which to shoot your first test pop. You'll then find that your first guesses are always pretty close, and the direction you have to go to fix it is pretty obvious.
Okay, so the direction you need to go to fix light quantities is usually pretty obvious. The problem is when you are, like, six stops off. Or is it four stops? It all looks the same -- nuclear.
Having a nice little cheat sheet on your flashes will get you in the ball park before you fire your first pop. Then, making a quick fix very easy. And pretty soon, you will not even need your cheat sheets to get close on the first try.
Reverse-engineering exercise:
If you like, take a shot at deciphering the lighting on the photo of the flash up top. Leave your thoughts in either the comments or on the photo's Flickr page. I'll post a setup shot next week.
_________
Related post:
:: GN: Your Free Flash Meter ::
Không có nhận xét nào:
Đăng nhận xét